I've been doing a lot of waiting lately. Waiting for a Court of Appeals decision that will lift the stays in all of my cases. Waiting for the espresso machine to heat up so I can get my little cuppa joe. Waiting for the BabeMobile to arrive at the dealership so we can install the car seat. Waiting for paint to dry so I can put on another coat. Waiting for the fourth hen to mature and start laying eggs. Patience has never been one of my virtues, which is why I think I tend to get a lot done -- while waiting for one thing to happen, I work on something else.
Today, I waited for dough to rise, twice, so I could get some cinnamon pull-apart loaf in my belly. It was not a tidy project, probably because I haven't done a lot of cooking or baking lately and my tidy work habits seem to have slipped. That, and the fact that I'm less than a month away from my due date makes me slower and less maneuverable around the kitchen (did I mention that there's still a bun in my oven?). So I did a lot of cleaning and tidying while waiting, which helped me kill some time.


Today, I waited for dough to rise, twice, so I could get some cinnamon pull-apart loaf in my belly. It was not a tidy project, probably because I haven't done a lot of cooking or baking lately and my tidy work habits seem to have slipped. That, and the fact that I'm less than a month away from my due date makes me slower and less maneuverable around the kitchen (did I mention that there's still a bun in my oven?). So I did a lot of cleaning and tidying while waiting, which helped me kill some time.

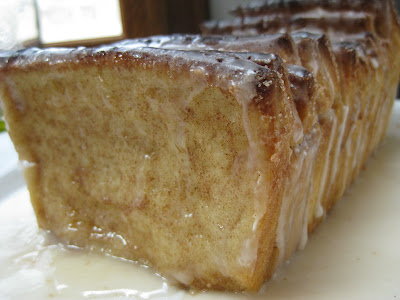
Even without having activities to stay busy while waiting, this loaf is well worth the wait. What's not to love? The scent of cinnamon and sugar is tantalizing and you get to savor it as soon as you start building the loaf, not just when it's in the oven. You can pull apart as much or as little as you want. If you're watching your weight, one little sliver comes apart as neatly as a stack of four (in my case, I'm watching my weight go up, so a stack of four was totally appropriate). As Mr. Rose pointed out, it's like a planar cinnamon bun, and who doesn't love a good cinnamon bun? This is just like a cinnamon bun, but the ratio of cinnamon to bun is higher and, in my opinion, better.

Here are your instructions to your own little slices of heaven. Enjoy!
Cinnamon Pull-Apart Cinnamon Loaf
(adapted from Better Homes & Gardens, April 2012)
3/4 c + 2 tbsp milk
2 1/4 tsp active dry yeast
1/2 c butter, melted
1/2 c + 2 tbsp granulated sugar
1 egg, lightly beaten
1/2 tsp granulated salt
3 c unbleached flour
2 tsp ground cinnamon
1/2 tsp vanilla
1 c powdered sugar
Orange zest or chopped nuts (optional)
Heat 3/4 c milk until just warm, but not hot to touch. Pour into a large mixing bowl and add yeast. Stir till yeast is dissolved and let sit for 5-10 minus. With a mixer, beat 1/4 c melted butter, 2 tbsp sugar, egg, and salt into the milk and yeast mixture until combined. Add half of the flour, then beat on medium speed to incorporate flour, scraping sides as needed, for 3 minutes. Stir in remaining flour. The dough will not be smooth, but shape it into a ball and transfer to a medium oiled bowl. Cover and set aside in a warm spot to rise and double, about 45-60 minutes.
Butter a 9"x5"x3" loaf pan; set aside. Mix 1/2 c granulated sugar with 2 tsp cinnamon; set aside. On a lightly floured surface, roll the dough into a 20"x12" rectangle. It will be much easier to cut into pieces if the dough is more rectangular in shape, so trim two edges so they are squared off and reincorporate the trimmed dough into the other two edges with a bit of water if necessary. Brush the dough with remaining 1/4 c melted butter and sprinkle surface with sugar and cinnamon mixture. Cut the dough into five (5) 4"strips (12" long). Stack the strips, then cut them into six (6) 2"pieces (4") long. Starting from one end of the loaf pan, loosely stack the 4" strips in the prepped pan, with cut edges up. Stagger them so that every other strip abuts opposite sides of the pan. You will have just enough strips to fill the pan. Let rise in a warm place for 45 minutes.
Make the glaze while you wait. In a small bowl, stir together powdered sugar, vanilla, and remaining 2 tbsp milk to achieve drizzling consistency. Set aside.
Preheat oven to 350 degrees F. Bake loaf till golden brown, about 30 minutes. Cool in pan on wire rack for 10 minutes. Then remove loaf from pan and transfer to serving plate. Drizzle with glaze. Top with orange zest or chopped nuts if you had the time or patience to prep them. Let cool for a few minutes more, then have at it.


